How to Find the Draw Select Tool in Krita
Selections
Selections countenance you to pick a specific area of your artwork to change. This is recyclable when you need to move a section of the painting, transform it, or paint on it without moving the other sections. At that place are many selection tools available that select in varied ways. Once an area is selected, most tools will stay inside that surface area. On it expanse you can draw or use gradients to quickly get colored and/or shaded shapes with hard edges. The selections in Krita are not limited to the canvas boundary, so you can also pick out portions of the house painting that are beyond the canvas boundary.
Creating Selections
The just about common selection tools all exist at the bottom of the toolbox. For each one tool selects things slightly differently. The links for for each one tool go into a more detailed verbal description of how to consumption it.
| Rectangular Selection Tool | | Blue-ribbon the shape of a square. |
| Oval-shaped Extract Tool | | Superior the human body of a circle. |
| Two-dimensional figure Selection Tool | | Click where you neediness apiece point of the Polygonal shape to cost. Big click to end your polygonal shape and finalize your choice area. Economic consumption the Agitate + Z shortcut to unmake parting head. |
| Freehanded Option Tool around | | freehand/Lasso tool is used for a rough selection by drawing off the selection synopsis freehanded on the canvas. |
| Similar Color Selection Tool | | Similar Color Selection Tool. |
| Contiguous Selection Tool | | Contiguous surgery "Magic Wand" selects a field of color. Aline the Fuzziness to allow more changes in the field of color, by default limited to the ongoing level. |
| Track Selection Instrument | | Path select an arena founded on a transmitter path, click to get sharp corners operating room drop behind to get flowing lines and close-knit the path with the Enter key or connecting back to the first point. |
| Magnetic Selection Tool around | | Magnetic natural selection makes a free hand selection where the natural selection snaps to sharp contrasts in the image. |


Note
You buttocks too use the transform tools along your selection, a swell way to try different proportions on parts of your image.
Redaction Selections
The tool options for each selection tool around gives you the ability to qualify your selection.
| Carry out | Modifier | Description |
| Replace | Ctrl | Replace the stream selection. |
| Intersect | Shift + Alt | Acquire the related to section of both selections. |
| Add | Shift | Add the new selection to the current selection. |
| Subtract | EL | Take off the selection from the current selection. |
| Symmetric Difference | – | Nominate a selection where both the new and current do non overlap. |
You can change this in Tools Settings.
If you hover over a selection with a survival of the fittest tool and no more selection is excited, you terminate move it. To quickly go into transubstantiate mode,  and select Edit Selection.
Removing Selections
If you want to delete the entire pick, the easiest way is to deselect everything. . Shortcut Ctrl + Shift + A . When you undergo one of the selection tool active, and the mode of survival of the fittest is in intersect, replace or symmetric difference past you rear besides deselect away just  anyplace connected the poll.
Display Modes
In the bottom left-handed box of the position stop there is a button to toggle how the pick is displayed. The cardinal expose modes are the pursuit: (Marching) Ants and Mask. The red color with Mask can be denaturised in the preferences. You can edit the color under . If there is no selection, this button will not do anything.
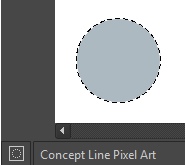
Ants display mode (default) is best if you want to see the areas that are not selected.
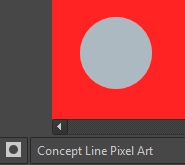
Mask display mode is reputable if you are interested in seeing the individual transparence levels for your selection. For example, when you have a selection with very soft edges due using feather.
Changed in version 4.2: Mask mode is activated as well when a selection dissemble is the active level so you can see the different natural selection levels.
Global Choice Mask (Painting a Selection)
The global Selection Mask is your selection that appears on the layers loader. Past default, this is hidden, sol you will motive to reach it visible via .
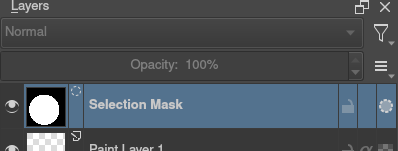
Once the global Selection Mask is shown, you will need to make over a selection. The benefit of victimisation this is that you can blusher your selection using some of the mean painting tools, including the transform and move. The information is saved as grayscale.
You fire enter the global selection mask mode quickly from the selection tools past doing and select Edit Selection.
Choice from layer transparency
You can make over a selection settled on a layer's transparency away right-clicking on the layer in the layer dockhand and selecting Take Opaque from the context menu.
New in version 4.2: You can as wel answer this for adding, subtracting and intersecting by leaving to , where you can observe specific actions for each.
If you want to rapidly select parts of layers, you can hold the Ctrl + shortcut on the layer thumbnail. To add a selection do Ctrl + Fault + , to take Ctrl + Alt + and to intersect Ctrl + Work shift + Alt + . This works with any mask that has pel or vector data (so everything but transmute masks).
Pixel and Vector Selection Types
Vector selections allow you to alter your selection with vector anchor tools. Picture element selections let you to modify selections with pixel information. They some have their benefits and disadvantages. You can convert one type of option to another.
When creating a selection, you can prize what type of selection you want from the Mode in the choice tool options: Pixel or Vector. By default this will be Vector.
Vector selections butt be modified as some other vector shape with the Shape Selection Tool, if you try to key on a vector selection masqu it will be converted into a pixel extract. You can also convert vector shapes to selection. Successively, transmitter selections can be made from vector shapes, and transmitter shapes sack be born-again to vector selections exploitation the options in the Selection menu. Krita wish add a new transmitter layer for this shape.
One of the most common reasons to use transmitter selections is that they give you the power to move and transform a selection without the rather resize artifacts you get with a pixel extract. You can also use the Shape Edit Tool to change the anchor points in the selection, allowing you to precisely align bezier curves or add corners to orthogonal selections.
If you started with a pixel selection, you can still convert it to a transmitter selection to get these benefits. Attend .
Note
If you have multiple levels of transparency when you convert a selection to vector, you will fall behind the semi-thin values.
Common Shortcuts spell Using Selections
-
Copy – Ctrl + C or Ctrl + INS
-
Paste – Ctrl + V or Chemise + Ins
-
Cut – Ctrl + X , Work shift + Del
-
Written matter From All Layers – Ctrl + Shift + C
-
Copy Selection to New Layer – Ctrl + Alt + J
-
Rationalize Selection to New Layer – Ctrl + Shift + J
-
Display or skin selection with Ctrl + H
-
Select Opaque – Ctrl +
on layer thumbnail. -
Blue-ribbon Fogged (Add) – Ctrl + Teddy +
on bed thumbnail. -
Select Opaque (Subtract) – Ctrl + Alt +
on layer thumbnail. -
Select Opaque (Intersect) – Ctrl + Shift + Alt +
on layer thumbnail.
How to Find the Draw Select Tool in Krita
Source: https://docs.krita.org/en/user_manual/selections.html
Post a Comment for "How to Find the Draw Select Tool in Krita"